POST /clients/token HTTP/1.1
Host: localhost:15553
Accept: application/json
Authorization: Basic bW1hZHVfYWRtaW46MTIzNDU2Nzg5MA==
Content-Type: application/x-www-form-urlencoded

grant_type=client_credentialsCreating Your First Domain
A domain is where it all happens, your very own user real, or user pool. A domain is completely distinct from another domain with unique users, roles, authorities and groups.
Our Imaginary App
Let’s say we have an imaginary app hosted at http://localhost:8080. We want this app
to be able to have users and we want the app to be secure. Users should have the view authority
while admin’s should have the edit authority.
Let’s also say our app has a callback implemented for authorization code grant flow. The call back
is at http://localhost:8080/oauth/callback.
Getting an Access Token
Before we can access the domain creation api, we must first get a token. We are going to obtain
a token with the client_credentials grant type from the identity provider, using the admin client id
and admin client secret.
This will return a response with an access_token that can be used to create a domain like the one below:
{
    "access_token": "eyJraWQiOiIxMjMiLCJhbGciOiJSUzI1NiJ9.eyJkb21haW5faWQiOiIwIiwic3ViIjoiNWVmODJiOWQxZmI2OTI3NDg3ODI3NmYwIiwiYXVkIjpbInVtcyIsImlkcyIsInVmcyJdLCJuYmYiOjE1OTMzMjIzOTcsImlzcyI6Im1tYWR1LmNvbSIsImV4cCI6MTU5MzMyNTk5NywiaWF0IjoxNTkzMzIyMzk3LCJhdXRob3JpdGllcyI6WyJhLiouKioiLCJyLiouKioiXSwianRpIjoiYTVkYzJjMzktZjc4Zi00ZWU4LWE4OGQtNTU5NGEzNGUyNzU0IiwiY2xpZW50X2lkIjoibW1hZHVfYWRtaW4ifQ.TpsXmmqc8DKA-5lx12W6JK5QXpbzpjkqPEBgU5oj__I9151v9bXX16xGF2A_gGoHK7JunGZ7OjuPFaPyS7rahuq-9KNAjQ_ZbBncytkVtNUf-h0WS-E3zM-5qnMTf5THU0zeTgii04U-rMgOgr3Qy6LKnYZraA1iUakX-MmR1Vkubf807im3_YqfjP3w86Xv62ipUuWiL64d-PZiYnM20s3lp5wHAWsFTFJPVHMPk0K96CHppDzYHh6WZF_kF9c5lPxqZFBmu8QY3Xfz8somAEq4jbldB7GW2W72gs7MTXtkO0omdedf3cwFItfQFWCHhLg8EyWhXUZu4SFqV5uThA",
    "token_type": "bearer",
    "expires_in": 1593325997,
    "jti": "a5dc2c39-f78f-4ee8-a88d-5594a34e2754"
}
We are going to use the access_token property for subsequent requests.
From now on we will use the <token> place holder to represent the access token.
Creating A Domain
To create a domain, execute the following request to the user service (assuming the user service is at port 15552):
POST /domains HTTP/1.1
Host: localhost:15551
Authorization: Bearer <token>
Content-Type: application/json
[
  {
    "id": "my-app",
    "name": "My Imaginary Application",
    "users": [
      {
        "username": "admin",
        "password": "admin-password",
        "externalId": 1111111111,
        "properties": {
          "country": "Nigeria",
          "email": "email@myapp.com"
        }
      }
    ],
    "authorities": [
      {
        "identifier": "view",
        "name": "View",
        "description": "View Data"
      },
      {
        "identifier": "edit",
        "name": "Edit",
        "description": "Edit Data"
      }
    ],
    "roles": [
      {
        "identifier": "admin",
        "name": "Admin",
        "description": "A My App Admin"
      },
      {
        "identifier": "user",
        "name": "User",
        "description": "A My App User"
      }
    ],
    "roleAuthorities": [
      {
        "role": "admin",
        "authority": "edit"
      },
      {
        "role": "admin",
        "authority": "view"
      },
      {
        "role": "user",
        "authority": "view"
      }
    ],
    "userAuthorities": [],
    "userRoles": [
      {
        "user": "admin",
        "role": "admin"
      }
    ],
    "groups": [],
    "userGroups": []
  }
]
Congratulations! We have now created a domain. You can access the authorize api and the load user api.
Application Authentication
Now we have a user, our imaginary application can use mmadu’s apis to check if a user/password credentials is valid and load the user.
Authenticating a user
To authenticate a user, our imaginary app will make a call to the authenticate api.
POST /domains/my-app/authenticate HTTP/1.1
Host: localhost:15551
Authorization: Bearer <token>
Content-Type: application/json

{
    "username": "admin",
    "password": "admin-password"
}
This returns an authenticated response.
{
    "status": "AUTHENTICATED"
}
Loading a user’s details
To load our admin user in or my-app domain, make the following request:
GET /domains/my-app/users/load?username=admin HTTP/1.1
Host: localhost:15551
Authorization: Bearer <token>
The api returns a json response as shown below:
{
    "id": "1111111111",
    "username": "admin",
    "password": "admin-password",
    "roles": [
        "admin"
    ],
    "authorities": [
        "view",
        "edit"
    ],
    "groups": [],
    "country": "Nigeria",
    "email": "email@myapp.com"
}
Now that we have created our application domain, let us configure this domain on the identity provider to secure our imaginary app with Oauth 2.0.
Configuring a Domain on the Identity Provider
We have a domain, but we also want to be able to issue access tokens to clients of our imaginary app. We want those tokens to contain authorities so that they can be used to access our secure imaginary app.
To configure domain my-app on the identity provider, we make this POST call.
POST /admin/domains HTTP/1.1
Content-Type: application/json
Authorization: Bearer <token>
Host: localhost:15553

[
  {
    "domainId": "my-app",
    "authorizationCodeType": "alphanumeric",
    "authorizationCodeTTLSeconds": 600,
    "maxAuthorizationTTLSeconds": 3600,
    "authorizationCodeTypeProperties": {},
    "refreshTokenEnabled": true,
    "refreshTokenProperties": {},
    "accessTokenProvider": "jwt",
    "accessTokenProperties": {
      "credentialId": {
        "type": "rsa"
      }
    },
    "issuerId": "myapp.com",
    "clients": [
      {
        "name": "my-app",
        "code": "my.app.1111",
        "applicationUrl": "http://localhost:8080",
        "logoUrl": "http://localhost:8080/logo.png",
        "tags": ["self"]
      }
    ],
    "clientInstances": [
      {
        "clientCode": "my.app.1111",
        "clientType": "CONFIDENTIAL",
        "clientProfile": "web_app",
        "credentials": {
          "type": "secret",
          "secret": "1234567890"
        },
        "identifier": "my.app.admin",
        "tlsEnabled": true,
        "supportedGrantTypes": [
          "authorization_code",
          "client_credentials"
        ],
        "scopes": [
            "admin"
        ],
        "authorities": [
            "view", "edit"
        ],
        "resources": [
            "my.app.service"
        ]
      }
    ],
    "resources": [
      {
        "identifier": "my.app.service",
        "name": "My Imaginary Application Service",
        "description": "My Imaginary Application Service"
      }
    ],
    "scopes": [
      {
        "code": "admin",
        "name": "admin",
        "description": "Admin Privileges",
        "authorities": [
          "view",
          "edit"
        ]
      }
    ]
  }
]
What did we just do?
-
We configured an identity provider for
my-appwith the following properties:-
The
authorizationCodeTypesets the authorization code generation type toalphanumericto generate random alphanumeric strings as the authorization code in authorization code grant type flow. -
The
authorizationCodeTTLSecondsconfigures the authorization code to expire after 600 seconds (10 minutes); -
The
maxAuthorizationTTLSecondsconfigures the maximum authorization validity (i.e. how long a user will stay signed in) to one hour. -
The
refreshTokenEnabledproperty enables refresh tokens. Refresh tokens will be added to access tokens during authorization code grant flow. -
We set the
accessTokenProviderproperty to jwt to use jwt access tokens. -
We configure the
accessTokenPropertiesto create jwt access token using a generated rsa key. This rsa key is generated, and the id of the key becomes thecredentialIdproperty. -
We set the
issuerIdproperty to or domain namemyapp.com.
-
-
In the
clientsproperty, we configure our own Client to be used to create our own client instances. A client can represent you or any third party company that wants to access your service.-
We give our client a unique code to be referenced when we create client instances.
-
We specify the application url to let mmadu know where our application is.
-
We set our
logoUrland also add a tagselfto signify that this client represents us.
-
-
In the
clientInstancesproperty, we create client instances. Client instances are actual oauth 2.0 clients that contain credentials used to access our secured apis.-
The
clientCodeis set to our client’s unique. -
The
clientTypeis set toCONFIDENTIALtelling oauth that this client requires authentication with specified credentials -
The
clientProfileis set to "web_app" to let Mmadu know what kind of app is accessing its api. -
The
credentialsis set to a secret to be used during authentication. -
We set the
identitierproperty tomy.app.admin. This is what we will use as the oauthclient_idin Oauth flows. -
We specify the supported grant types, scopes, authorities and resources that this client has access to.
-
Now that we have configured our app on the identity provider, we can now test it out.
Accessing our Imaginary App
Using Client Credentials
If we want to access our client app through its api, we use the client id and secret that we just created.
Our client_id is my.app.admin, and our client_secret is 1234567890.
We use the client_credentials grant flow to obtain an access token with the credentials above:
POST /clients/token HTTP/1.1
Host: localhost:15553
Authorization: Basic bXkuYXBwLmFkbWluOjEyMzQ1Njc4OTA=
Content-Type: application/x-www-form-urlencoded

grant_type=client_credentials
This returns
{
    "access_token": "eyJraWQiOiIxMjMiLCJhbGciOiJSUzI1NiJ9.eyJkb21haW5faWQiOiJteS1hcHAiLCJzdWIiOiI1ZWY4NTJjOTY4N2JkMjYyZTc2OThjYWUiLCJhdWQiOiJteS5hcHAuc2VydmljZSIsIm5iZiI6MTU5MzMzMjQyNSwiaXNzIjoibW1hZHUuY29tIiwiZXhwIjoxNTkzMzM2MDI1LCJpYXQiOjE1OTMzMzI0MjUsImF1dGhvcml0aWVzIjpbInZpZXciLCJlZGl0Il0sImp0aSI6IjIzZTBjMTMzLWJiNjgtNGYzZi1iNzYzLTNlOTk0ZTkyNTgwMSIsImNsaWVudF9pZCI6Im15LmFwcC5hZG1pbiJ9.FzrdQwAWZ9N3PHL0SeEKOwucTniUiSLjRvYlx2M5izx4Fu_x7JWhA0IzBOOQrb16A_lbcTz1TVr55ADw30C2ifkGudHdounG1OCxMbTFTaaLk1nNdjcRP3uqL10MaBD1ofuutn-aLxsJQtyHkW9Jk-BWCEIU0tKAxLdceF3aPsGEsHiA62oCr9_mNJOTatvYcubm_BwpE_-j0LGZK0QLLZNk6GSsn_WxLXVqhX0SiNG38kNTB3W07Nj1lUpudSEOUu84Veay-HyK-hgSVUTqVIe5Yn-rS2At8KWdn0Oxed4a2DS57indb0h30OGjcGCXQHYXPUASTcbDOhMyg_ZavA",
    "token_type": "bearer",
    "expires_in": 1593336025,
    "jti": "23e0c133-bb68-4f3f-b763-3e994e925801"
}
A quick inspection of the access_token will reveal the following claims:
{
  "domain_id": "my-app",
  "sub": "5ef852c9687bd262e7698cae",
  "aud": "my.app.service",
  "nbf": 1593332425,
  "iss": "mmadu.com",
  "exp": 1593336025,
  "iat": 1593332425,
  "authorities": [
    "view",
    "edit"
  ],
  "jti": "23e0c133-bb68-4f3f-b763-3e994e925801",
  "client_id": "my.app.admin"
}-
The
domain_idclaim is set to the domain id. -
The
subclaim is set to the id of the authorization -
The
audclaim is set to the resource the token will will be used to consumemy.app.service -
The
expclaim is the expiry time -
The
iatclaim is the issued at time -
The
nbfclaim states that this token should not be used before this time. -
The
authoritiesclaim returns a list of authorites for this client. This is provided on creation of the client instance. -
The
jtiis the token identifier -
The
client_idis the client instance identifier
Using Authorization Code
Supposing our admin user wants to access our app, he clicks on a Login button
which is designed to redirect to the authorization page. Below is an example of
such a login button
<a href="http://localhost:15553/oauth/authorize?client_id=my.app.admin&response_type=code&redirect_uri=http://localhost:8080/oauth/callback">Login</a>| In practice your button should make a post request to a login endpoint implemented by you, in which you redirect to the authorize endpoint |
This will redirect you to a login screen if you have not logged in.
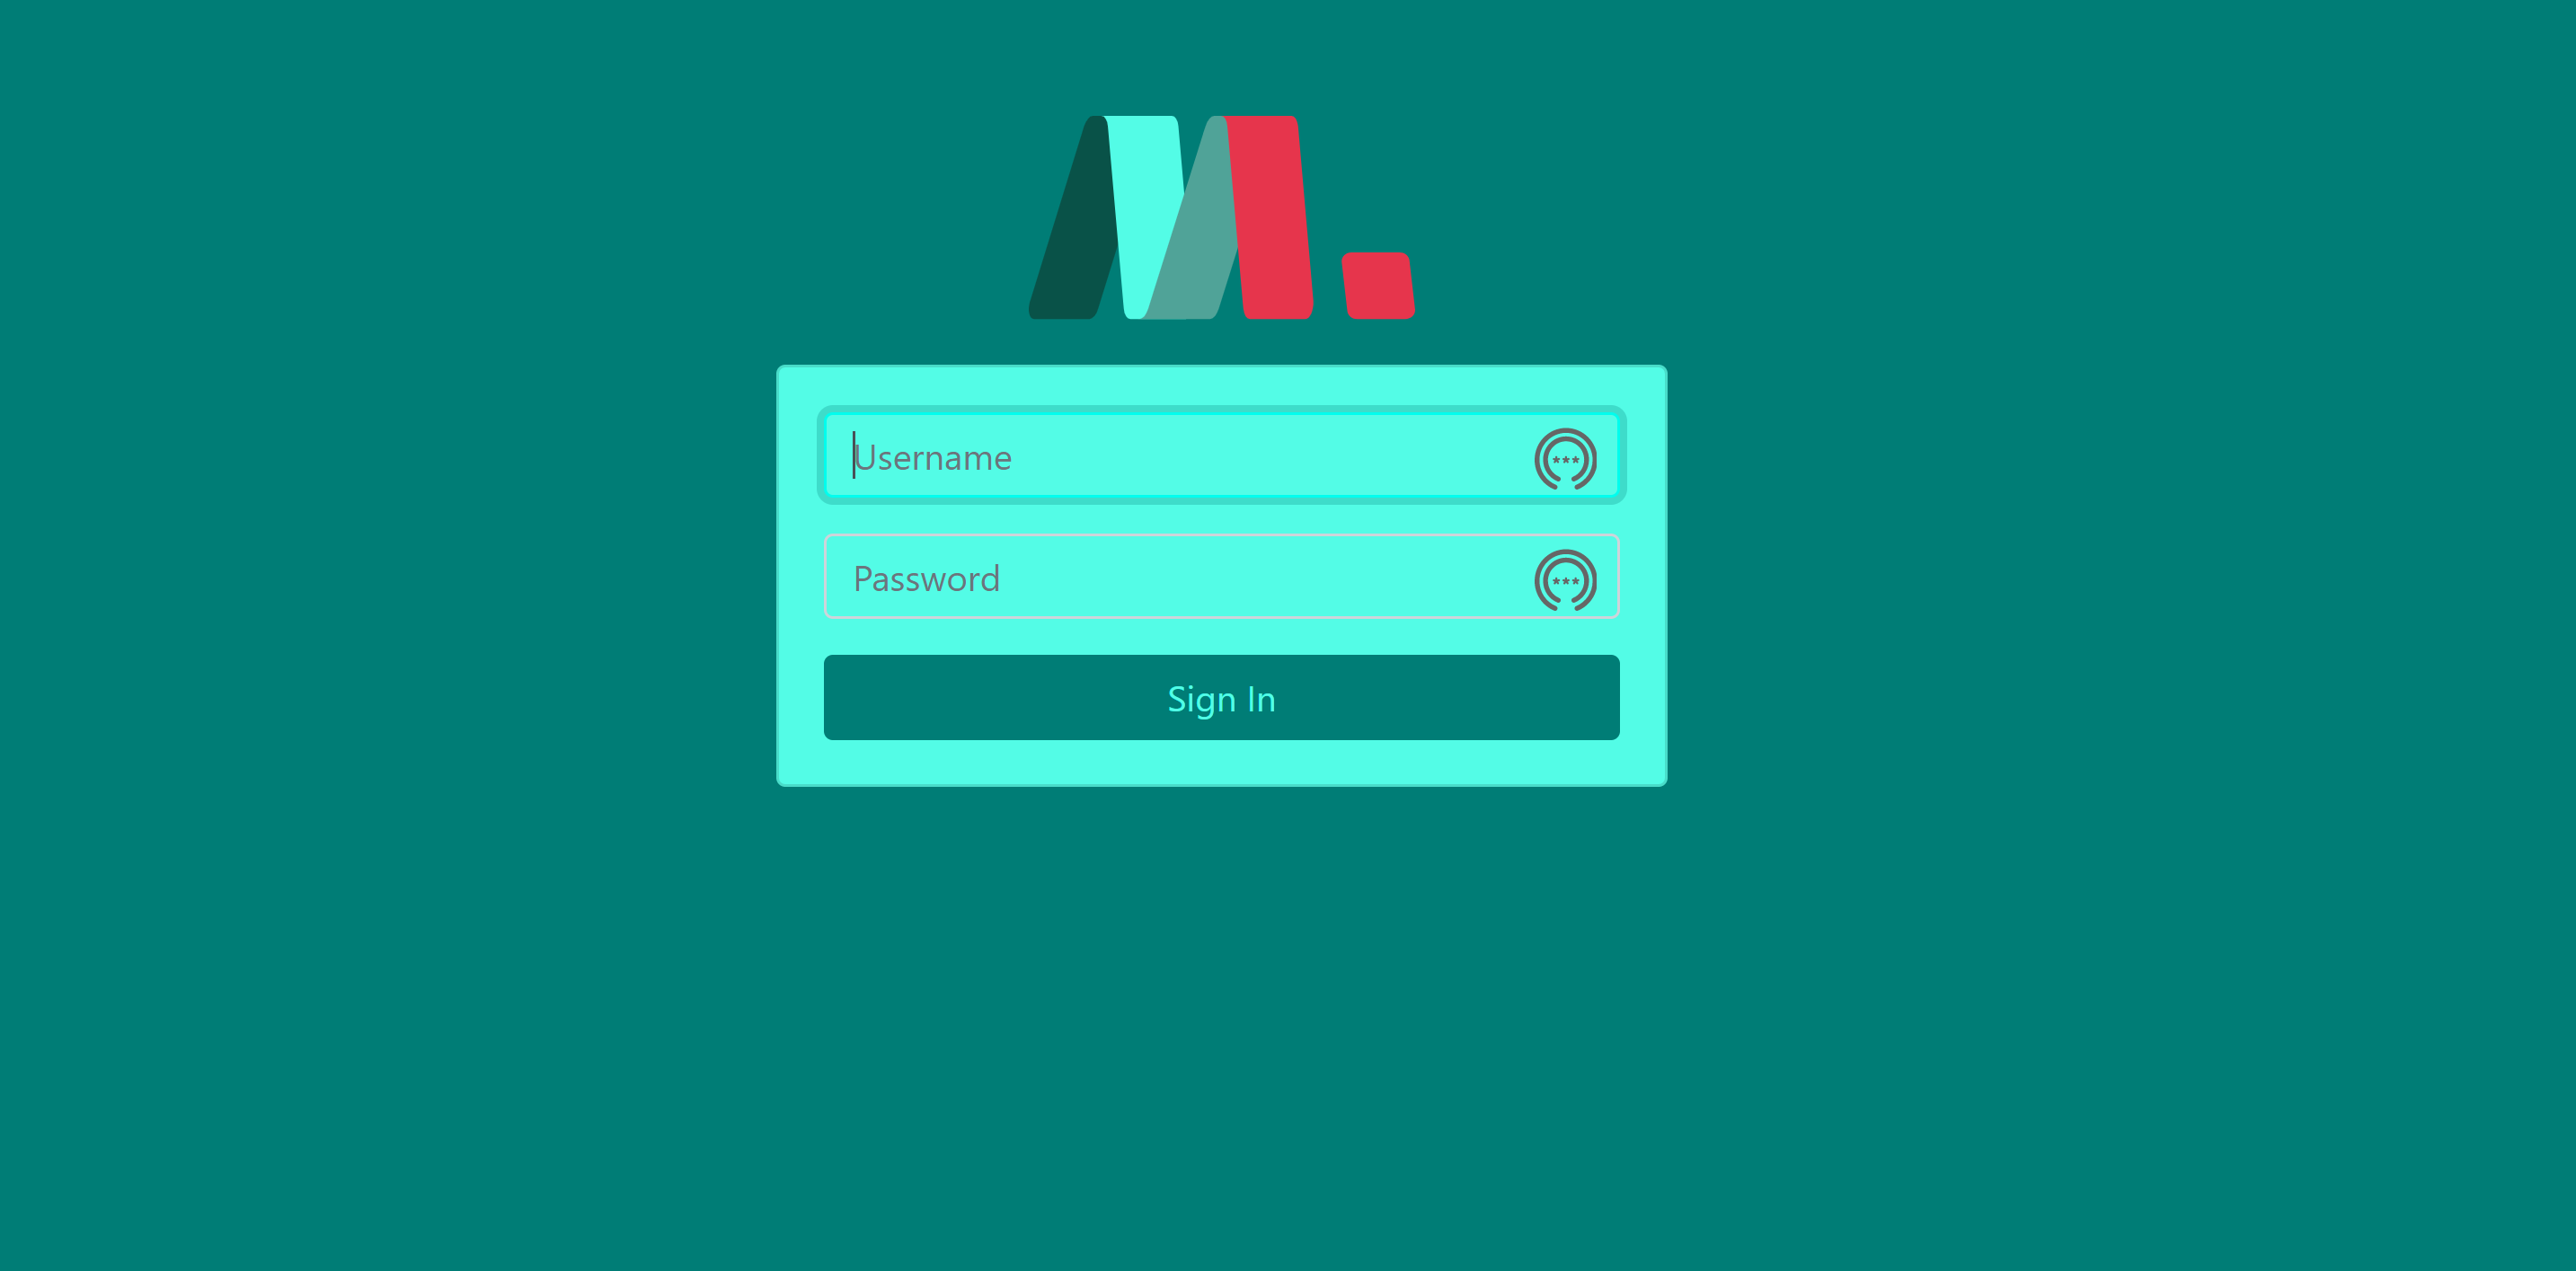
Figure 1. Mmadu Login Screen
Enter the admin user name and password (admin/admin-password in this case). If successful, you will be redirected to the authorization page.
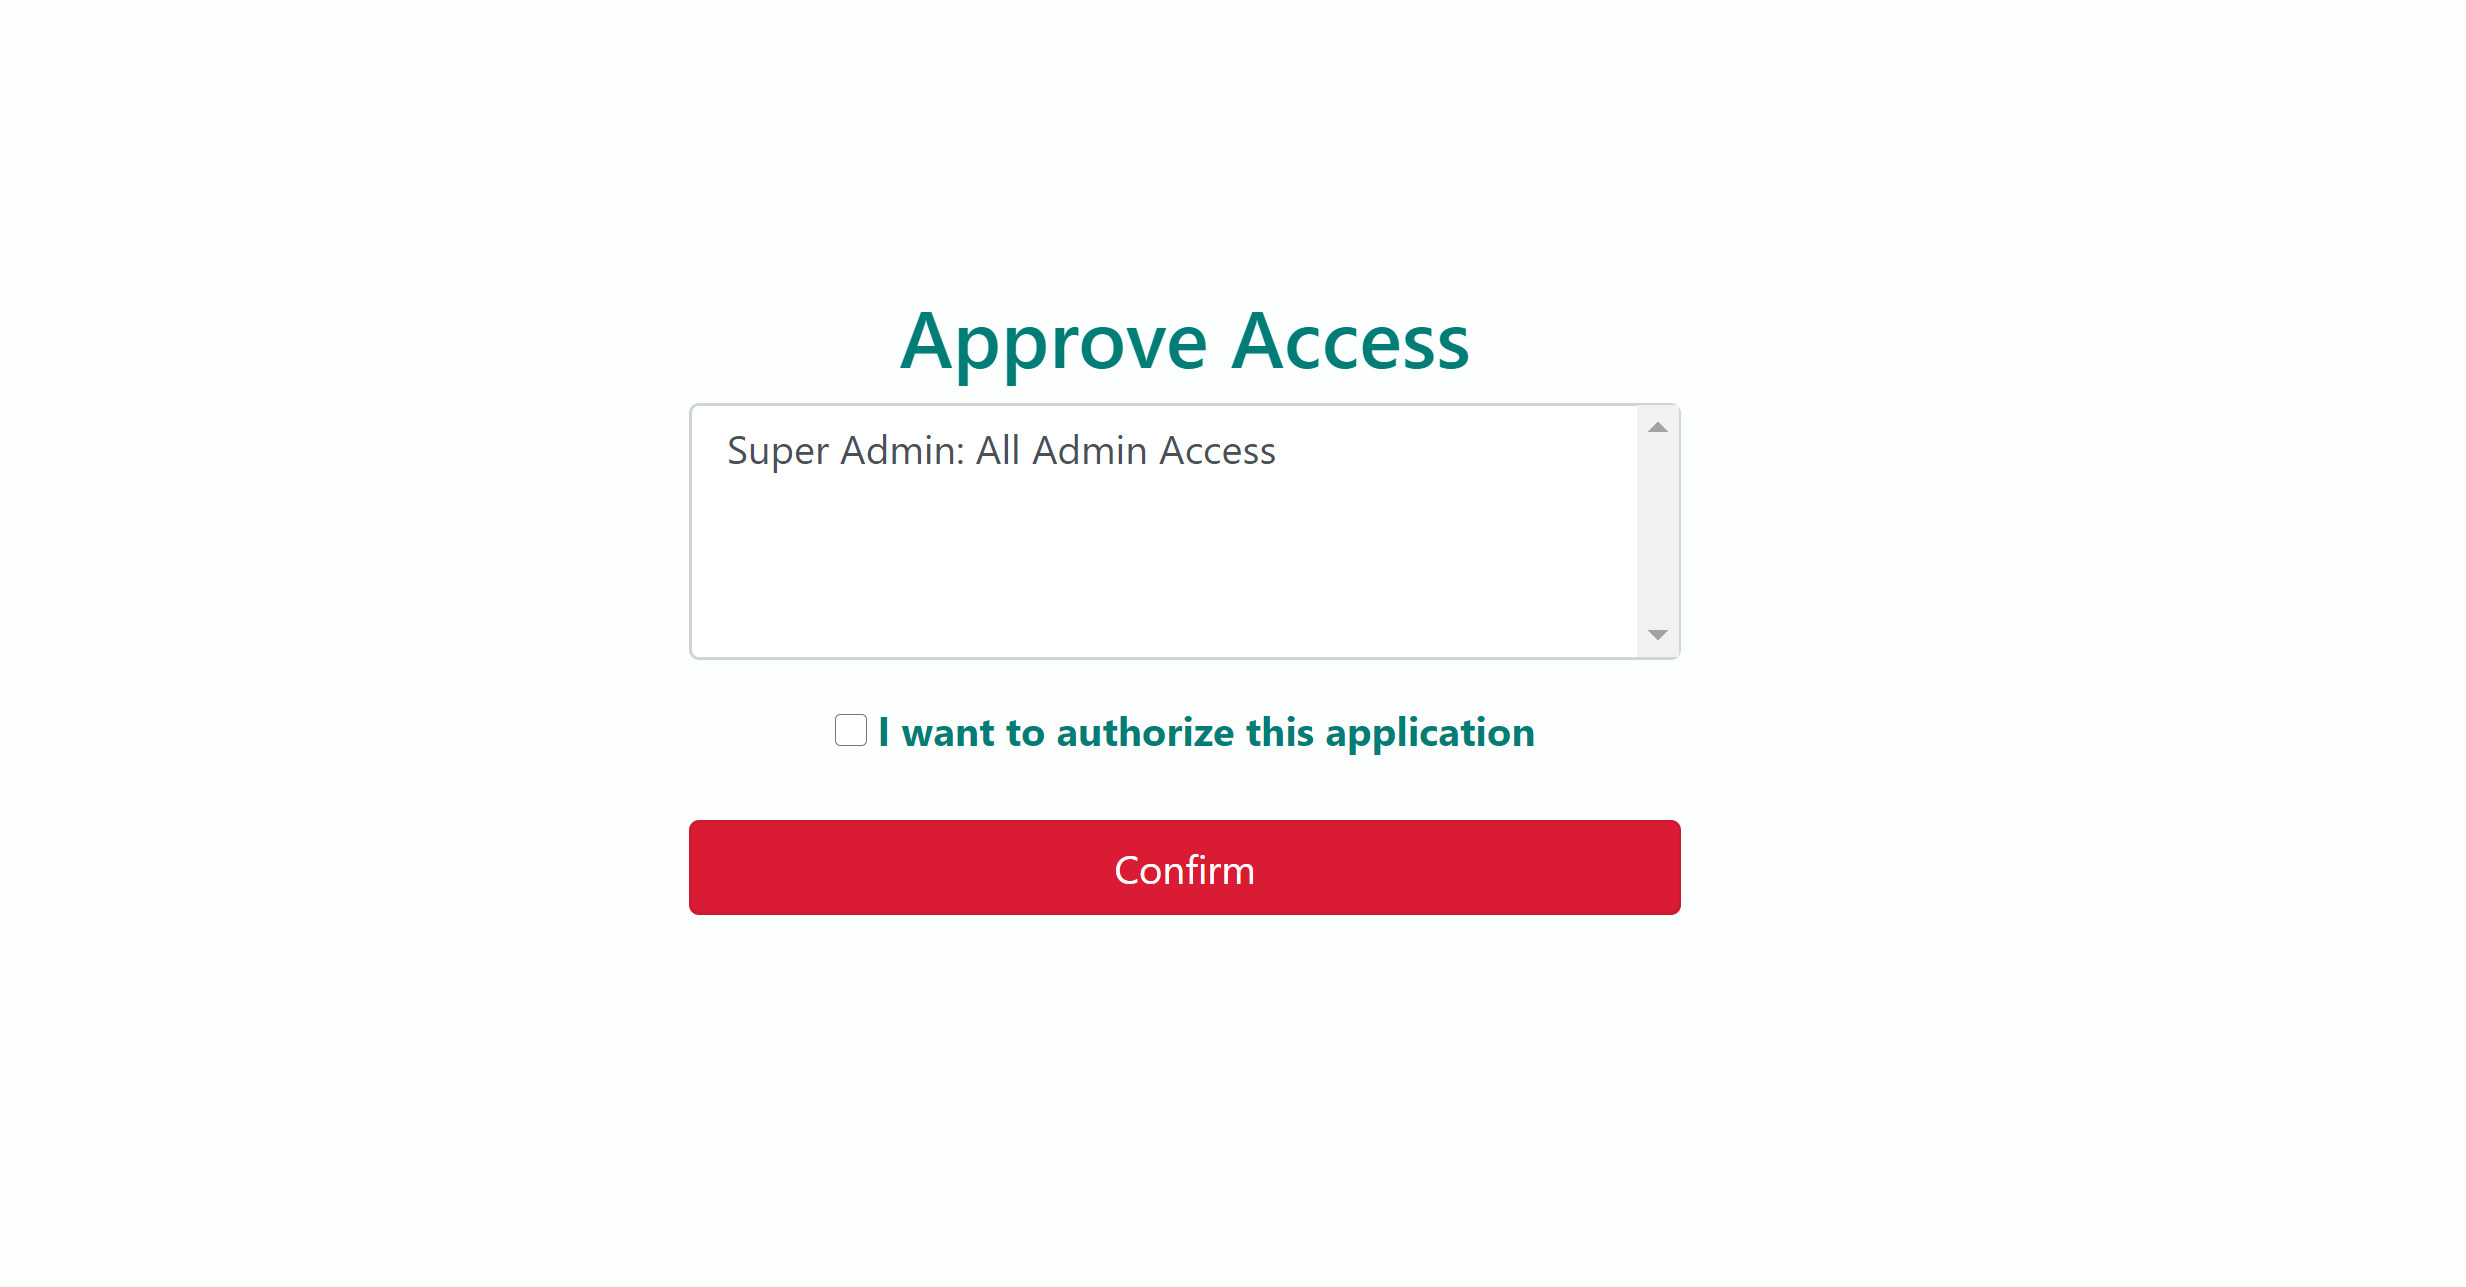
The authorize screen lets you know that a client application wants to access certain scopes you possess. Select the ones you want to grant (in this case admin).
Check the "I want to authorize this application", and click confirm.
You will be redirected to the back to the configured call back with a code in the query param.
http://localhost:8080/oauth/callback?code=K5s0BKyfF4
Your application should be configured to listen to the callback, retrieve the authorization code, and make a call to the /clients/token endpoint to get the token
POST /clients/token HTTP/1.1
Host: localhost:15553
Authorization: Basic bXkuYXBwLmFkbWluOjEyMzQ1Njc4OTA=
Content-Type: application/x-www-form-urlencoded

grant_type=authorization_code&code=K5s0BKyfF4
If authorization is successful, an access_token and a refresh token is returned.
{
    "access_token": "eyJraWQiOiIxMjMiLCJhbGciOiJSUzI1NiJ9.eyJkb21haW5faWQiOiIwIiwic3ViIjoiNWVmODVkMzQ2ODdiZDI2MmU3Njk4Y2IyIiwiYXVkIjpbInVtcyIsImlkcyIsInVmcyJdLCJuYmYiOjE1OTMzMzUzMjEsInVzZXJfaWQiOiIxMTExIiwic2NvcGUiOiJhLiouKiogc3VwZXJfYWRtaW4gci5zdXBlcl9hZG1pbiIsImlzcyI6Im1tYWR1LmNvbSIsImV4cCI6MTU5MzMzNTYyMSwiaWF0IjoxNTkzMzM1MzIxLCJqdGkiOiIxNWMzMjJlZC02MWI1LTQzNWEtOWVmMy02YzBjOThhMDQ4OTYiLCJjbGllbnRfaWQiOiJtbWFkdV9hZG1pbiJ9.hdgo4JnswWI63N-vI-BDEgukBaVsHttqRw3s_JCLmbjISzU3z9fOq4y8y_mZa4sZc3tVHf9xETVefBfjLZl2pIGMRLdjYZac0_iPcOYzmXjP9eOcnYCjhjMTb02ZYhYpWRQt83gWUt1U4apoxQstXW0sKbdaqCa_oaDbg0drW-ComCg0cssgXsePMHqlvQUjn6GC7IdYgNh-FBSpNOiQ1XLOS4O62EgA75nO6OOwt4bTRdNLM9mBFRb8av89W4fzAKnL0l4_KXZM6hmFamvfCLS4FRBegBy463zvRSSHodhx75Q6r5kn_MgXToMWOt-urOjXiCehB2E7boynw9tbmw",
    "token_type": "bearer",
    "expires_in": 1593335621,
    "refresh_token": "oxz46a4uaq11oC47FWQy",
    "jti": "15c322ed-61b5-435a-9ef3-6c0c98a04896"
}
An inspection of the token reveals the following claims.
{
  "domain_id": "my-app",
  "sub": "5ef85d34687bd262e7698cb2",
  "aud": [
    "my.app.service"
  ],
  "nbf": 1593335321,
  "user_id": "1111111111",
  "scope": "admin view edit",
  "iss": "mmadu.com",
  "exp": 1593335621,
  "iat": 1593335321,
  "jti": "15c322ed-61b5-435a-9ef3-6c0c98a04896",
  "client_id": "my.app.admin"
}
As we can see, for authorization grant type, we do not have the authorities property (because those are authorities
granted to the client and not the user). We have two new properties:
. The user_id representing the logged in user
. The scope properties containing the approved scopes with roles and authorities.
Once this access_token has expired, we can get a new token using the refresh token endpoint.
This enpoint returns a new access_token and refresh_token.
POST /clients/token HTTP/1.1
Host: localhost:15553
Authorization: Basic bXkuYXBwLmFkbWluOjEyMzQ1Njc4OTA=
Content-Type: application/x-www-form-urlencoded

grant_type=refresh_token&refresh_token=oxz46a4uaq11oC47FWQy
This returns a new pair of access_token and refresh_token.
{
    "access_token": "eyJraWQiOiIxMjMiLCJhbGciOiJSUzI1NiJ9.eyJkb21haW5faWQiOiIwIiwic3ViIjoiNWVmODVkMzQ2ODdiZDI2MmU3Njk4Y2IyIiwiYXVkIjpbInVtcyIsImlkcyIsInVmcyJdLCJuYmYiOjE1OTMzMzYwMTUsInVzZXJfaWQiOiIxMTExIiwic2NvcGUiOiJhLiouKiogc3VwZXJfYWRtaW4gci5zdXBlcl9hZG1pbiIsImlzcyI6Im1tYWR1LmNvbSIsImV4cCI6MTU5MzMzNjMxNSwiaWF0IjoxNTkzMzM2MDE1LCJqdGkiOiJjYjg0ZDZhZi03YTM1LTQ5YTgtYTcxZS00MmZlNGUyN2RkM2UiLCJjbGllbnRfaWQiOiJtbWFkdV9hZG1pbiJ9.cKyNSzmeJB8aMGrJozM2uw_hpfJxoNimmcZJMgmz6pkuUE0O8xnXYShuLmYZSJJ_UeOgLS8mLDsg2fuBALsfbY0JqGprmRaYDh_f03hX9SQri4apvLIoi4O5WfoNzAmk0cgKSBDUrIEr-AaE8htOCln8SDrCdU3yLRbOPkRQsSe3C_Tl7buSD4aMZMxyWk2zOgMqQYnKAFEju-GrYoWYcu1tIiBthDN2YHLQaWjLQ22j0qGnV4Efpjmgi6Y-ZykFivp-WsSg6ruha0EPaVDQ4w0sNS39d2KScAh4ZsOh_UcW-meuhkYLc35oz-UN9pum88iJroLuQcvcCks9_AVEXg",
    "token_type": "bearer",
    "expires_in": 1593336315,
    "refresh_token": "hhju7LmcPRA39BDCZwrk",
    "jti": "cb84d6af-7a35-49a8-a71e-42fe4e27dd3e"
}
Congratulations, you have configured your domain with mmadu identity.
Configuring a Domain for User Registration
We need to create a means for new users to register. Let us provision our
my-app domain for registration. Let our users register with a username, email, password and country fields.
Configuring a Domain with a Registration Profile
Make a POST /domains request to the registration service below:
POST /domains HTTP/1.1
Host: localhost:15551
Authorization: Bearer <token>
Content-Type: application/json

{
  "domains": [
    {
      "domainId": "my-app",
      "registrationProfiles": [
        {
          "defaultRedirectUrl": "https://localhost.8080",
          "headerOne": "My App",
          "headerThree": "Register",
          "instruction": "Fill all the fields to register",
          "submitButtonTitle": "GO!!",
          "code": "user",
          "fields": [
            "app.email",
            "app.username",
            "app.country",
            "app.password"
          ]
        }
      ],
      "fields": [
        {
          "name": "email",
          "placeholder": "Email",
          "property": "email",
          "fieldTypeId": "mmadu.fields.email",
          "label": "Email",
          "code": "app.email",
          "order": 1,
          "required": true
        },
        {
          "name": "Country",
          "placeholder": "Country",
          "property": "country",
          "fieldTypeId": "mmadu.fields.text",
          "label": "Country",
          "order": 2,
          "code": "app.country",
          "required": true
        },
        {
          "name": "username",
          "placeholder": "Username",
          "property": "username",
          "fieldTypeId": "mmadu.fields.text",
          "label": "Username",
          "order": 3,
          "code": "app.username",
          "required": true
        },
        {
          "name": "password",
          "placeholder": "Password",
          "property": "password",
          "fieldTypeId": "mmadu.fields.password",
          "label": "Password",
          "code": "app.password",
          "order": 4
        }
      ]
    }
  ]
}
When that’s done, we can now register new users by going to the registration link
http://localhost:15551/my-app/register/user
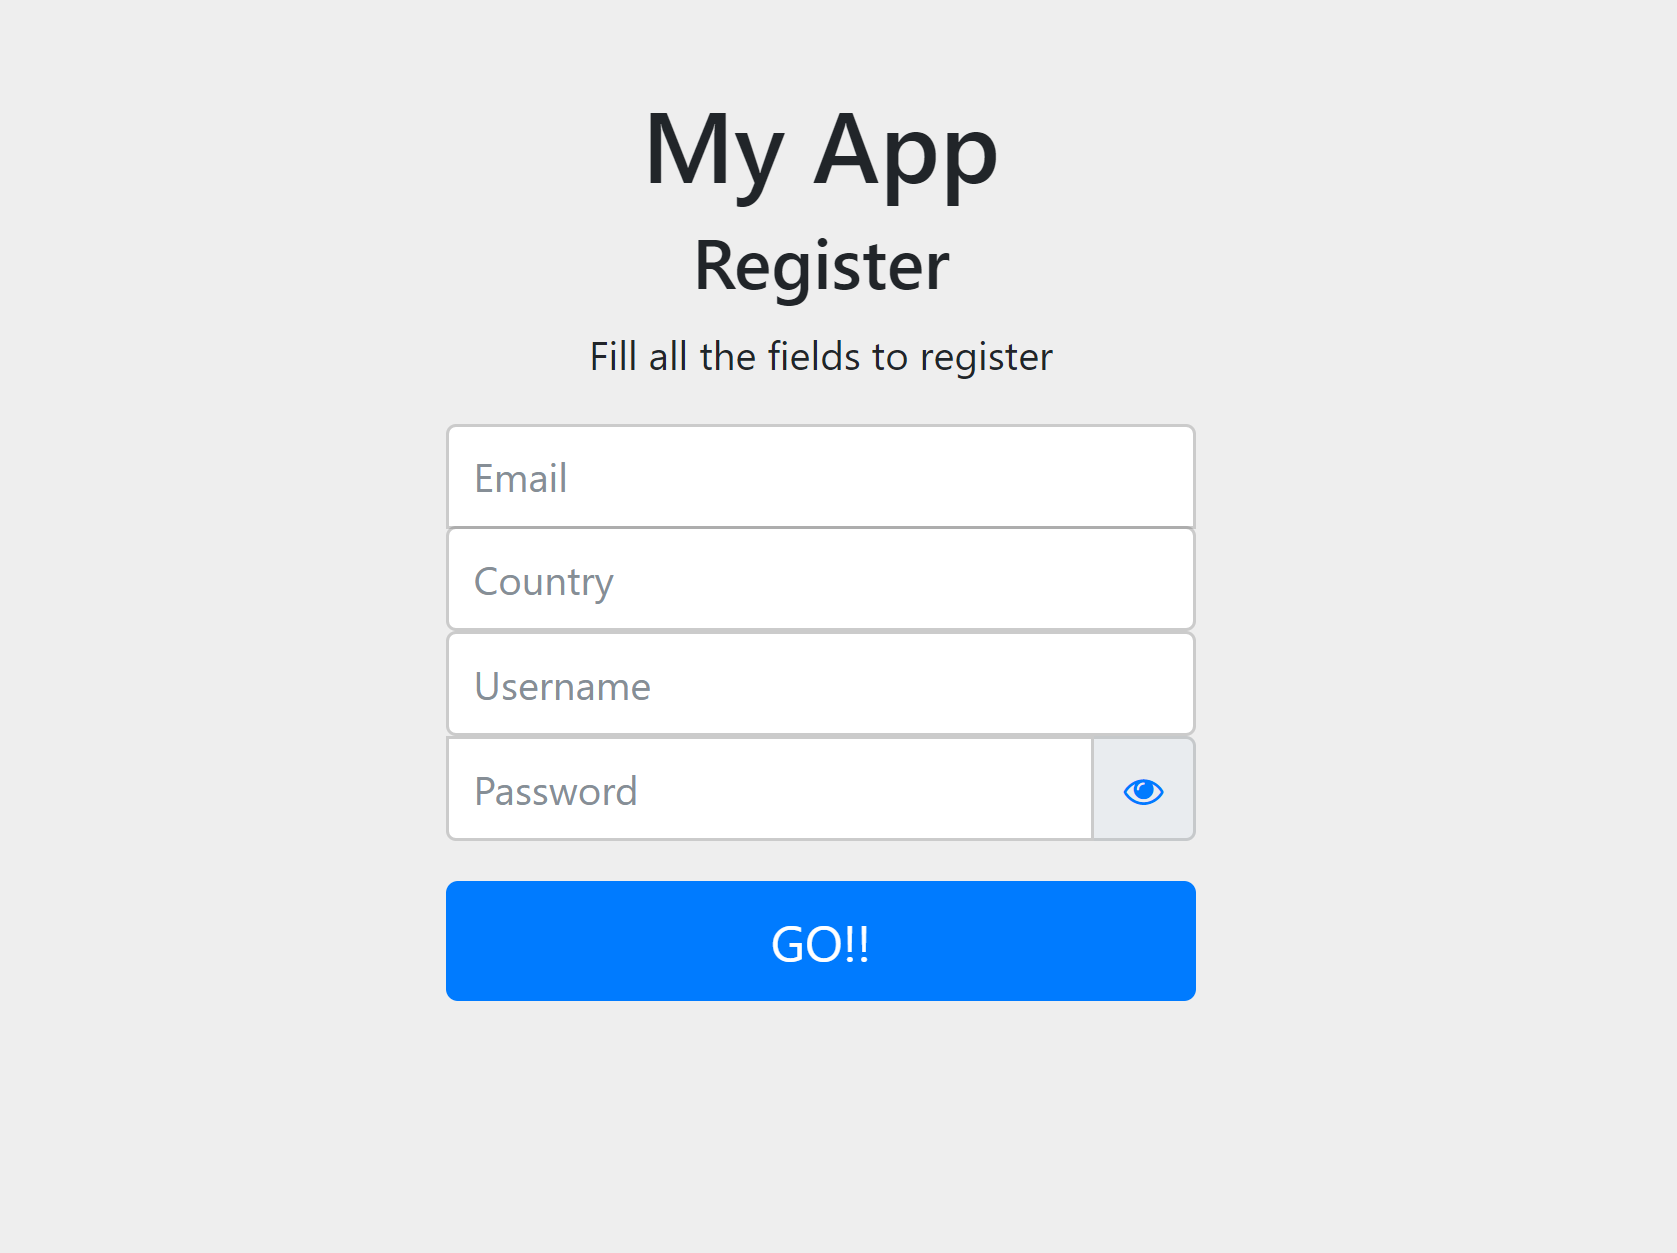
It directs you to a registration form where you a new user can fill. Once completed and user presses Go!!!, it saves the user to the user service and you now have a new user!
Now that you have created a domain, lets work on real apps with the other guides.